Do It Yourself Holiday Gifts
I know the holidays can be a stressful financial time for many people, so here I have provided some creative, cheap holiday gifts everyone will love!
Mason Jars
Oreo Cheesecake:

Makes 6 to 8 ounce jars of cheesecake
INGREDIENTS
8 ounces cream cheese at room temperature
1/2 cup sugar
3 large eggs at room temperature
4 ounces sour cream (1/2 cup)
1 tablespoon fresh lemon juice
12 oreos, divided
¼ teaspoon salt
1/2 cup sugar
3 large eggs at room temperature
4 ounces sour cream (1/2 cup)
1 tablespoon fresh lemon juice
12 oreos, divided
¼ teaspoon salt
SPECIAL EQUIPMENT
Electric beater
Six 6-ounce or 8-ounce mason jars
Deep baking dish
Optional: Twine and wooden spoon to tie to gift
Electric beater
Six 6-ounce or 8-ounce mason jars
Deep baking dish
Optional: Twine and wooden spoon to tie to gift
PREPARATION
1. Preheat your oven to 325°F.
1. Preheat your oven to 325°F.
2. Using an electric mixer, beat room temperature cream cheese on medium speed until it is smooth. Add the sugar, then beat on medium speed for 3 more minutesReduce speed to low. Add eggs, 1 at a time, beating well after each addition. Raise speed to medium. Add sour cream, lemon juice, and 1/4 teaspoon salt. Beat for 3 more minutes.
3. Put a pot of water on to boil. (You will need enough water to fill the baking dish and reach ½ way up the sides of your jars.)
4. Using your hands, break 8 of the oreos into small pieces, then gently fold the oreo pieces into the batter.
5. Divide batter among the six jars. Fill each jar half full. Put the jars in a deep baking dish, then pour enough boiling water into the dish to reach halfway up the sides of the jars. Cover the dish with foil and cut 8 slits in the foil to vent. Bake at 325°F until they are set in the center, about 25 minutes. Let cool. Refrigerate overnight to set.
6. Make the oreo topping: Put the remaining four oreos in a plastic bag and seal it, then whack at them with the back of a spoon to crush them. Top each cheesecake with a spoonful of oreo crumbs, seal jars, and tie a spoon around each.
No prep tag required for this one! Already made and ready to eat!
Blondie Bars:
 INGREDIENTS
1 cup all-purpose flour
Pinch of salt
½ cup bittersweet or semisweet chocolate chips
½ cup peanut butter chips
1 cup brown sugar
HOW TO PREPARE THE GIFT
Combine flour and salt in bottom of jar. Carefully top with a layer of chocolate chips, then with a layer of peanut butter chips. (Try to sprinkle the chips around the perimeter of the jar to create a layered look.) Wrap brown sugar in plastic bag, plastic wrap, or parchment paper to keep it separate, then place it on top.
Combine flour and salt in bottom of jar. Carefully top with a layer of chocolate chips, then with a layer of peanut butter chips. (Try to sprinkle the chips around the perimeter of the jar to create a layered look.) Wrap brown sugar in plastic bag, plastic wrap, or parchment paper to keep it separate, then place it on top.
DIRECTIONS TO INCLUDE
How To Make Chocolate-Peanut Butter Blondies
Makes 8 blondies
Makes 8 blondies
You will need:
Blondie Mix from gift
1 stick butter, melted
1 large egg
1 teaspoon vanilla extract or 1/2 teaspoon almond extract
Pinch salt
Blondie Mix from gift
1 stick butter, melted
1 large egg
1 teaspoon vanilla extract or 1/2 teaspoon almond extract
Pinch salt
Special equipment:
8”x8” baking pan
Electric mixer
8”x8” baking pan
Electric mixer
PREPARATION (Include this on the tag as well)
1. Preheat oven to 350°F
1. Preheat oven to 350°F
2. Butter an 8”x8” baking pan.
3. Carefully lift brown sugar (top layer) out of the jar.
4. Pour as many of the chocolate and peanut butter chips as you can into a bowl, then, in a separate bowl, dump the remaining flour mixture from the jar. It’s OK if there are some chips in the flour and some flour in the chips, just separate as best you can.
5. Combine melted butter and brown sugar and beat with electric mixer until smooth.
6. Add egg and beat 1 minute more.
7. Add vanilla and beat just to combine.
8. Add dry ingredients to butter-egg mixture and fold in with a spatula until just combined. Don’t overmix. Add chocolate and peanut butter chips fold until just combined.
9. Pour batter into greased baking pan. Bake at 350°F 20-25 minutes, or until set in the middle.
Be sure to include the preparation of the treats somewhere on the jar, or make a tag like shown above!
Bath Bombs
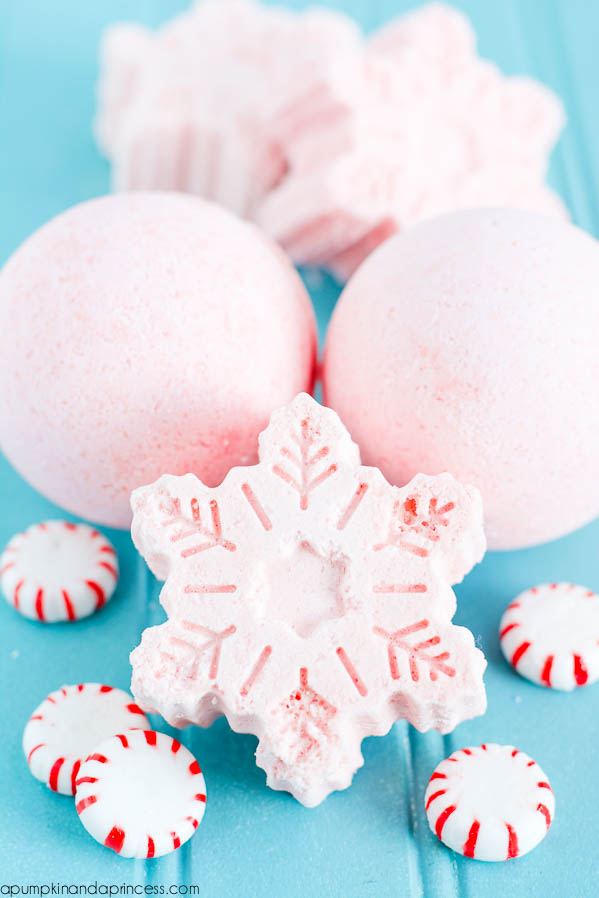 DIY Peppermint Bath Bomb - yields 3 bath bombs
1 cup baking soda
1/2 cup Citric Acid
1/2 cup cornstarch
3 tablespoon epsom salt
2 teaspoons Sweet Almond Oil
3/4 teaspoon water
15-20 drops Peppermint Oil
food coloring (optional)
1/2 cup Citric Acid
1/2 cup cornstarch
3 tablespoon epsom salt
2 teaspoons Sweet Almond Oil
3/4 teaspoon water
15-20 drops Peppermint Oil
food coloring (optional)
In a large bowl combine baking soda, citric acid, cornstarch and epsom salts.
In a small bowl combine almond oil, water, essential oil, and food coloring.
Pour wet mixture into dry mixture. Mix with a whisk until fully combined. Use your hands to press bath bomb mixture into mold.
In a small bowl combine almond oil, water, essential oil, and food coloring.
Pour wet mixture into dry mixture. Mix with a whisk until fully combined. Use your hands to press bath bomb mixture into mold.
You can use the ornament balls I mentioned above or make creative shapes with baking molds. Tip: carefully press the mixture into the silicone mold, try not to press too hard to avoid having the mold widen and distort the design. I let the ornament balls set for 2 hours before removing the plastic ornament ball, then setting them on a towel to dry overnight. For the snowflake mold I let them dry overnight. The dry time will depend on the humidity in your area and home.
No comments:
Post a Comment